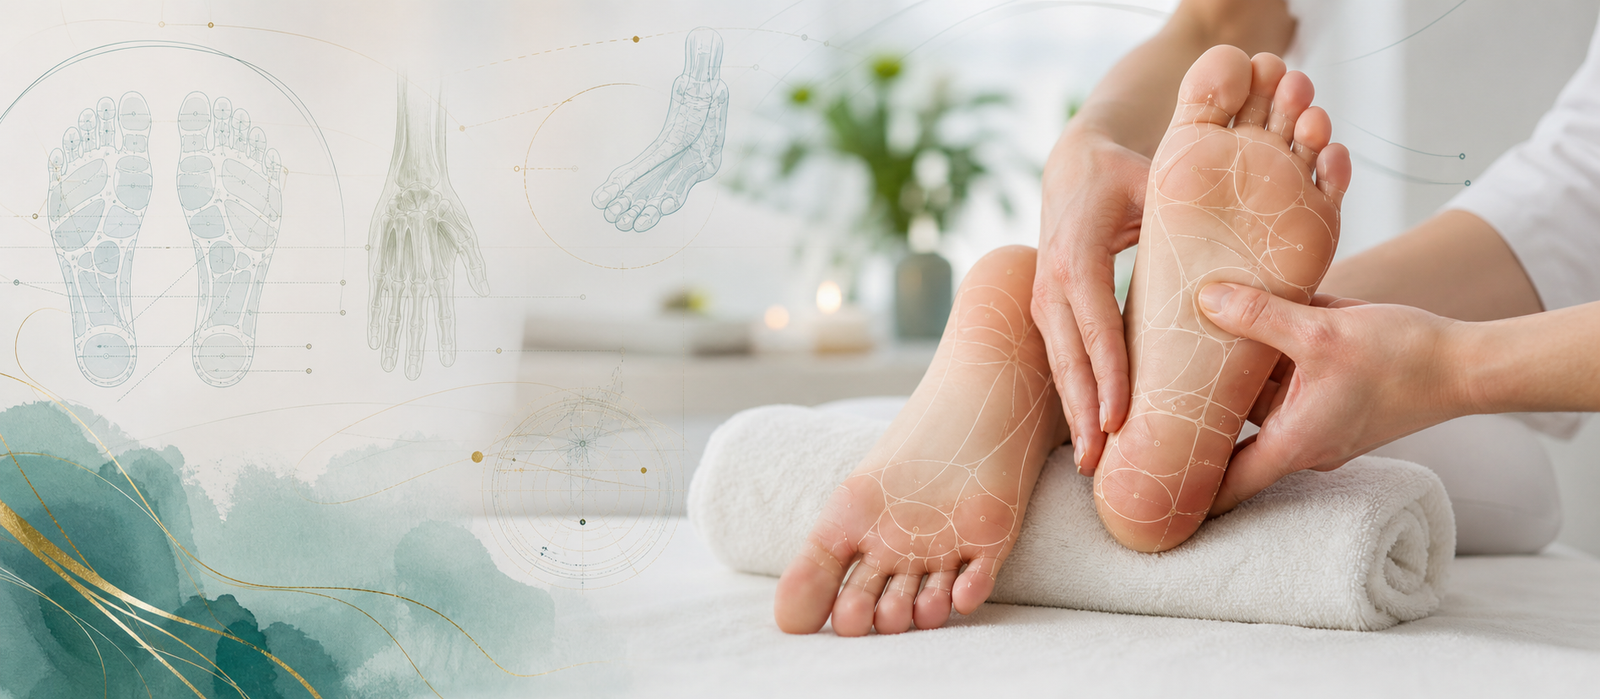
Wiki ReflexologyClinical Encyclopedia

Pressure points for pain relief, acupressure safety, and self-care

How to Relieve Pain Using Pressure Points: A Safety-Led Acupressure Guide

Learn how to use pressure points for mild pain, headaches, nausea, neck tension, cramps, and body discomfort with safety rules, diagrams, and red flags.

Comfort Support Medical copy review SQLite article
Premium clinical reflexology Resources banner with atlas-inspired therapeutic foot and hand imagery.

Use Pressure Points for Pain Relief with a Safety Frame First

Pressure points are popular because they make pain relief feel practical: find a spot on the hand, wrist, shoulder, neck, leg, or foot, press it with your thumb, breathe for a minute, and notice whether the body settles. The public WikiHow article on relieving pain with pressure points introduces this beginner pathway through acupressure technique and several well-known points, including GB21, GB20, P6, LI4, TE3, LV3, SP6, and ST36. This Wiki Reflexology guide keeps the useful entry point, but rebuilds the topic into a more professional, evidence-aware, and safety-led resource.

The first upgrade is medical realism. Acupressure can be a helpful comfort practice for mild, familiar discomfort, tension-type headaches, neck and shoulder tightness, nausea support, menstrual cramps, stress arousal, and general body tension. It is not a diagnostic method. A tender point does not tell you why pain exists, whether inflammation is present, whether a nerve is compressed, or whether a symptom needs urgent care.

The second upgrade is technique. Good pressure-point work is not a contest of force. It is measured, specific, comfortable, and reversible. A useful session has a clear goal, a safe point choice, moderate pressure, slow breathing, gradual release, and reassessment. If the point creates sharp pain, numbness, dizziness, spreading symptoms, or fear, the routine is no longer self-care.

Editorial note: the WikiHow page was used as a topic reference only. This article is original, substantially expanded, and rebuilt with new educational diagrams, red-flag guidance, pressure rules, point-selection logic, pregnancy cautions, and medical source references.

Professional Visual Set

These original diagrams are designed for education, not diagnosis. They show the main pressure-point families used in this guide: head and neck points, shoulder points, hand points, wrist nausea support, leg and foot points, safe pressure dosing, and red flags.

Contact sheet showing professional educational diagrams for pressure points and pain relief including overview, pressure technique, headache and neck points, hand points, wrist P6, leg and foot points, and safety red flags.
Complete visual set for a safety-led pressure-point guide: overview, technique, head and neck, hand, wrist, leg and foot, and red-flag safety.

What Pressure Points Can and Cannot Do

Acupressure is a manual practice related to acupuncture and traditional East Asian medicine. Instead of needles, the person uses fingers, thumbs, palms, knuckles, or simple tools to stimulate mapped points. Some points are local, placed near the painful area. Others are distal, placed on the hand, foot, wrist, or leg but traditionally used for symptoms elsewhere in the body.

Modern explanations are more cautious than traditional maps. Pressure may help by relaxing muscle tone, focusing attention, encouraging slower breathing, interrupting a stress loop, increasing local comfort, or giving the nervous system a non-threatening sensory input. For some people, that is enough to make a headache feel less intense, a neck less guarded, or nausea easier to tolerate. For others, it does little. Both outcomes are normal.

Acupressure should not be promoted as a cure for severe headache, dental infection, abdominal emergency, fracture, blood clot, nerve damage, cancer pain, infection, inflammatory disease, severe menstrual pain, or persistent unexplained symptoms. NCCIH describes acupuncture-related evidence as condition-specific, with some pain areas studied more than others; self-acupressure is generally less standardized than acupuncture. That is why this article uses comfort language rather than cure language.

Overview diagram showing pressure point families for pain relief including head, neck, shoulder, hand, wrist, leg, ankle, and foot points with safety boundaries.
Overview: pressure points can support comfort, but they do not replace diagnosis, medical care, movement, hydration, sleep, or appropriate pain treatment.

Red Flags Come Before Point Selection

Before choosing any pressure point, decide whether self-care is appropriate. For mild, familiar, non-traumatic discomfort, a short acupressure routine may be reasonable. For severe, sudden, progressive, neurological, infectious, traumatic, or medically unexplained pain, the safest choice is medical advice rather than stronger pressure.

Seek urgent help for a sudden severe headache, headache after a significant head injury, new weakness, trouble speaking, confusion, fainting, new vision loss, high fever with stiff neck, chest pain, severe abdominal pain, vomiting blood, sudden severe pelvic pain, new numbness or weakness, or pain with symptoms that feel frightening or unusual. For period pain, NHS inform advises assessment when pain is severe enough to interfere with normal daily life, changes from your usual pattern, occurs outside the period, or comes with heavy bleeding, irregular bleeding, unusual discharge, or painful sex.

There are also local pressure cautions. Do not press over wounds, rashes, burns, infection, swelling, bruising, varicose veins, a suspected clot, recent surgery, fracture, numb areas, reduced sensation, or skin that is hot, red, or weeping. If you are pregnant, recently gave birth, have a blood-clotting disorder, take blood thinners, have neuropathy, have cancer-related pain, or are immunocompromised, use professional guidance before experimenting with pressure-point routines.

Safety red flag chart for pressure points showing emergency headache signs, severe abdominal or pelvic pain, pregnancy cautions, unsafe skin sites, and referral rules.
Safety first: pressure points are for mild self-care, not for emergency symptoms, progressive neurological signs, unsafe tissue, or unexplained severe pain.

The Safe Pressure Technique

A safe pressure-point technique has five parts: locate, test, press, breathe, and reassess. Locate the point by using a broad anatomical region rather than a single magic dot. Test the tissue with light pressure first. Press with a 3 to 5 out of 10 intensity, where 0 is no pressure and 10 is intolerable pain. Breathe slowly while holding or circling the point. Reassess after release.

For most home routines, 30 to 90 seconds per point is enough. Some clinical patient-education routines use two to three minutes for a specific point such as LI4 or P6, but that does not mean every point needs long or forceful pressure. More pressure is not more therapeutic. A dull ache, warmth, or sense of release can be acceptable; sharp pain, electric sensation, numbness, nausea, dizziness, or spreading symptoms are stop signals.

Use the soft pad of the thumb or finger rather than a nail. Keep the wrist relaxed. If using a tool, choose a blunt eraser-style pressure or smooth ball rather than a hard point. Release slowly instead of snapping away from the tissue. After each point, move the area gently if movement is comfortable.

Safe pressure technique diagram showing locate, test, press, breathe, release, reassess, and a 0 to 10 pressure scale.
Technique rule: pressure should feel clear and tolerable. If it hurts, spreads, numbs, or alarms you, reduce pressure or stop.

Headache, Neck, and Shoulder Points: GB20, GB21, LI4, and TE3

For head, neck, and shoulder discomfort, the most common pressure-point families are around the base of the skull, the top of the shoulder, and the hands. GB20, often called Feng Chi, is found in the hollows where the neck muscles meet the base of the skull. GB21, often called Jian Jing, is in the upper shoulder muscle between the neck and the shoulder tip. LI4 sits in the web between the thumb and index finger. TE3 sits in the groove between the ring finger and little finger.

For mild tension-type headache or neck tightness, begin gently. Place the thumbs into the soft hollows under the skull, angle pressure slightly upward, and hold for 20 to 30 seconds. For GB21, use a broad pinch or palm pressure on the upper trapezius, not a hard jab. For hand points, press both sides for 30 to 60 seconds and notice whether the jaw, shoulders, or breathing soften.

There are important limits. Do not use acupressure as a workaround for a sudden severe headache, headache after injury, new neurological symptoms, fever with stiff neck, new visual problems, confusion, pregnancy-related severe headache, or headache that is getting worse over time. Avoid strong GB21 or LI4 pressure during pregnancy unless a qualified professional has cleared it, because these points are traditionally treated with caution.

Head neck and shoulder pressure point diagram showing GB20 at the base of the skull, GB21 on the upper shoulder, and red flag headache cautions.
Head and shoulder points can be useful for mild tension patterns, but headache red flags come first.

Hand Points for General Pain: LI4 and TE3

LI4, also called Hegu, is one of the best-known hand points in public acupressure education. Memorial Sloan Kettering describes LI4 as a hand point used for pain and headaches, with clear cautions for pregnancy and unsafe skin. In practical self-care language, LI4 is an accessible anchor: it is easy to reach, easy to repeat on both sides, and does not require pressing directly into the painful area.

To find LI4, relax the hand and locate the fleshy web between the thumb and index finger. Press the highest part of that muscle with the opposite thumb, using circular pressure for 30 to 90 seconds. If you prefer a shorter beginner routine, use 30 seconds per hand. If the tissue is sore, reduce pressure. Do not use LI4 on broken, inflamed, infected, blistered, or swollen skin.

TE3, also called Zhong Zhu, is found between the fourth and fifth metacarpals, behind the knuckles of the ring and little fingers. It is traditionally used for temporal headache, upper back tension, and neck or shoulder discomfort. Work the groove with gentle circles rather than forceful digging. LI4 and TE3 combine well for desk-related tension because they can be used without touching the neck or shoulder directly.

Hand pressure point diagram showing LI4 between thumb and index finger and TE3 between ring and little fingers with pregnancy and skin safety cautions.
Hand points: useful first-line self-care because they are accessible and easy to dose gently.

Wrist Point for Nausea: P6 or Neiguan

P6, also called Neiguan, is the classic inner-wrist point used for nausea support. It is located on the palm side of the forearm, about three finger-widths below the wrist crease, between two tendons. MSKCC patient education describes P6 as a point that can be used for nausea and vomiting support. It is also the point targeted by many motion-sickness wristbands.

To locate it, turn your palm upward. Place three fingers of the other hand across the wrist starting at the wrist crease. The point sits just below that measure, between the two central tendons. Press with the thumb or index finger, use small circles, and breathe slowly. Start with 60 seconds per wrist; if it feels comfortable and useful, extend toward two minutes.

Use P6 as support, not as a reason to ignore serious symptoms. Seek medical care for vomiting blood, green vomit, severe abdominal pain, chest pain, confusion, stiff neck, severe headache, dehydration, possible poisoning, persistent vomiting, or nausea in pregnancy that you cannot manage. Do not press over wrist wounds, swelling, rash, infection, recent surgery, or painful tendon irritation.

Wrist P6 Neiguan pressure point diagram for nausea support showing three-finger measurement below the wrist crease and two tendons.
P6/Neiguan: a practical wrist point for nausea support, with medical red flags still in charge.

Leg, Knee, Ankle, and Foot Points: UB40, ST36, SP6, and LV3

Lower-body pressure points are often used when pain feels connected with the hips, legs, abdomen, fatigue, or menstrual discomfort. UB40 is at the back of the knee crease. ST36, or Zu San Li, is on the outer shin below the knee. SP6, or San Yin Jiao, is on the inner lower leg above the ankle. LV3, or Tai Chong, is on the top of the foot between the big toe and second toe.

Use these points with extra safety awareness. Behind the knee contains important blood vessels and nerves, so UB40 should be gentle and brief. Do not press there if the calf or knee is swollen, red, hot, painful, recently injured, or suspected of having a clot. ST36 can tolerate broader pressure for many people, but avoid bruised, inflamed, numb, or injured tissue. LV3 on the foot should be light if there is diabetes, neuropathy, reduced sensation, foot wounds, swelling, or vascular disease.

SP6 is traditionally used for pelvic and menstrual discomfort, but it is also one of the points most commonly treated with caution in pregnancy. Do not use SP6 if you are pregnant or might be pregnant unless a qualified clinician has advised you. For menstrual cramps that are mild and familiar, SP6 and LV3 can be used gently as comfort points; severe, changing, disabling, or unusual period pain should be assessed rather than masked.

Leg and foot pressure point diagram showing UB40 behind the knee, ST36 on the outer shin, SP6 above the inner ankle, and LV3 on top of the foot with clot, pregnancy, and neuropathy cautions.
Leg and foot points: choose broad, gentle pressure and avoid pregnancy points, clot concerns, neuropathy, wounds, or swollen tissue.

How to Choose a Point by Pain Pattern

Choose points by pattern, not by promise. If the pain is a mild tension headache with neck tightness, try GB20, hand LI4, and TE3 before touching sore tissues aggressively. If nausea is the main issue, P6 is the most logical starting point. If the pain is upper shoulder tightness from posture or stress, use broad GB21 pressure only if pregnancy is not a concern and the tissue is not inflamed. If the discomfort is in the leg or hip after sitting, gentle ST36 or broad gluteal pressure may be safer than digging behind the knee.

For menstrual cramps, pair non-pressure care with pressure-point support: heat, hydration, gentle movement, rest, and appropriate over-the-counter pain relief if safe for you. SP6 and LV3 may be used as comfort points for mild, familiar cramps, but severe period pain is not something to normalize. If pain disrupts school, work, sleep, or ordinary activities, or if the pattern changes, medical assessment is appropriate.

For general stress-related body discomfort, start with the least risky points: LI4, TE3, P6, or gentle foot pressure away from wounds or numbness. A good acupressure session leaves you calmer and more aware, not bruised or sore. If you cannot tell which point to use, choose technique quality over point complexity.

Start with Hand or Wrist Points When

The painful area is too sensitive to touch, you are at work, symptoms feel stress-related, or you want a lower-risk self-care option.

Use Local Points Only When

The symptom is mild and familiar, there are no red flags, and broad pressure near the area feels clearly comfortable.

5, 10, and 15 Minute Pressure-Point Routines

A five-minute routine is best for a work break. Use 30 seconds on LI4 on each hand, 30 seconds on TE3 on each hand, 60 seconds on P6 on the wrist if nausea or stress is present, then take one minute to breathe and move the neck or shoulders gently.

A ten-minute routine can be symptom-specific. For headache and neck tension, combine GB20, LI4, TE3, and gentle shoulder pressure. For nausea, use P6 on both wrists, then rest with slow breathing. For lower-body discomfort, use ST36 and LV3 gently, then walk for two minutes. For menstrual cramps, use heat first, then consider gentle SP6 and LV3 only if pregnancy is not possible and symptoms are familiar.

A fifteen-minute routine should still be modest. Choose no more than four point families. Work both sides when appropriate. Keep pressure moderate. End with movement, hydration, and reassessment. If you need long daily routines just to function, or if symptoms return immediately and intensely, the problem needs a broader plan than pressure points alone.

  1. Screen: stop for red flags, pregnancy uncertainty, wounds, swelling, numbness, suspected clot, fever, trauma, or unusual symptoms.
  2. Select: choose one symptom goal and two to four point families rather than pressing every point you know.
  3. Dose: use 30 to 90 seconds per point at a 3 to 5 out of 10 pressure level.
  4. Breathe: keep the jaw, shoulders, belly, and hands relaxed while pressing.
  5. Release: come off the point slowly, then move the area gently if comfortable.
  6. Reassess: track pain, nausea, movement, mood, and any new symptoms before deciding whether to repeat.

Common Mistakes to Avoid

  1. Pressing harder when the point hurts: pain is not proof that the point is working. Reduce pressure or stop.
  2. Using pressure over unsafe tissue: avoid wounds, swelling, rashes, bruises, varicose veins, suspected clots, infection, and numb areas.
  3. Ignoring medical red flags: sudden severe headache, neurological symptoms, chest pain, severe abdominal pain, and traumatic pain require care.
  4. Forgetting pregnancy cautions: strong LI4, GB21, SP6, and several ankle or lower-back points are commonly avoided or modified in pregnancy.
  5. Turning a routine into a diagnosis: a point response is a comfort observation, not proof of a specific organ, nerve, or meridian problem.
  6. Using too many points: a simple, repeatable routine is safer and easier to evaluate than a long list of random pressure points.

Aftercare and Progress Tracking

After a routine, record three things: symptom intensity, function, and side effects. Symptom intensity can be a 0 to 10 score. Function means what you can do afterward: turn your neck, walk, sit, eat, work, sleep, or breathe more comfortably. Side effects include bruising, soreness, dizziness, nausea, numbness, headache change, or any symptom that feels new.

If a point helps, keep the dose conservative. Repeat once or twice a day for a few days if it remains comfortable. If it causes soreness or no benefit, change strategy rather than pressing harder. Pain is influenced by sleep, hydration, stress, load, posture, hormones, medication use, injury, inflammation, and medical conditions; pressure points are only one small tool.

For practitioners and students, document the same logic: client goal, symptom pattern, red flags screened, pregnancy status when relevant, points used, pressure level, response, aftercare, and referral advice. Do not write that a point response proves a condition. Write that the client reported a response to a comfort technique.

Our Recommendation as a Reflexology Education Site

Our recommendation is to treat pressure points as a comfort protocol with boundaries. The best version is calm, anatomical, moderate, and honest. It begins with safety, uses the easiest points first, avoids unsafe tissue, and ends with reassessment. It does not promise instant cure, organ correction, or diagnosis through tenderness.

For students, the priority is not memorizing every point name. The priority is learning how to choose a safe region, dose pressure, communicate limits, recognize red flags, and refer when symptoms are outside self-care. A careful practitioner who knows when to stop is more useful than one who can name many points but ignores warning signs.

For readers at home, start with hand and wrist points before working directly on painful tissue. Keep the session short. Do not chase pain. Use medical care when pain is severe, sudden, progressive, traumatic, neurological, infectious, pregnancy-related, or unexplained. Used that way, pressure points can be a useful self-care companion without pretending to replace healthcare.

FAQ: Pressure Points and Pain Relief

Can pressure points really relieve pain?

They may help some people feel more comfortable, especially with mild tension, headache, nausea, stress arousal, or familiar body discomfort. They should not be presented as a cure for a medical condition.

What is the safest point to start with?

LI4 and P6 are common starting points because they are easy to locate and do not require pressing directly into a painful back, neck, abdomen, or joint. Use pregnancy and skin-safety cautions.

How hard should I press?

Use moderate pressure, about 3 to 5 out of 10. The sensation can be clear or achy, but it should not be sharp, electric, numbing, or frightening.

Can I use pressure points every day?

Yes, if the routine is gentle, comfortable, and does not create bruising or soreness. If you need daily pressure to manage significant pain, you also need to review the underlying cause and care plan.

Are pressure points safe during pregnancy?

Pregnancy changes the safety plan. Several points commonly discussed for pain relief are avoided or modified in pregnancy, so ask a qualified healthcare professional before using acupressure while pregnant or possibly pregnant.

Scientific, Medical, Therapeutic, and Book References

Online references

Book references

  • Deadman, P., Al-Khafaji, M., and Baker, K. A Manual of Acupuncture. Traditional acupoint location reference.
  • Aung, S. K. H. and Chen, W. P. D. Clinical Introduction to Medical Acupuncture. Clinical acupuncture and acupressure context.
  • Ingham, E. Stories the Feet Can Tell Thru Reflexology. Historical reflexology reference.
  • Marquardt, H. Reflexotherapy of the Feet. Professional reflex-zone therapy reference.