Eye strain reflexology, pressure points, and screen-fatigue self-care
How to Relieve Eye Strain with Reflexology: A Safety-Led Pressure Point Guide
Learn a safety-led reflexology and acupressure routine for eye strain with facial points, foot and hand reflex zones, 20-20-20 screen breaks, red flags, and professional diagrams.
Eye Strain Relief Starts with Safety, Not Pressure
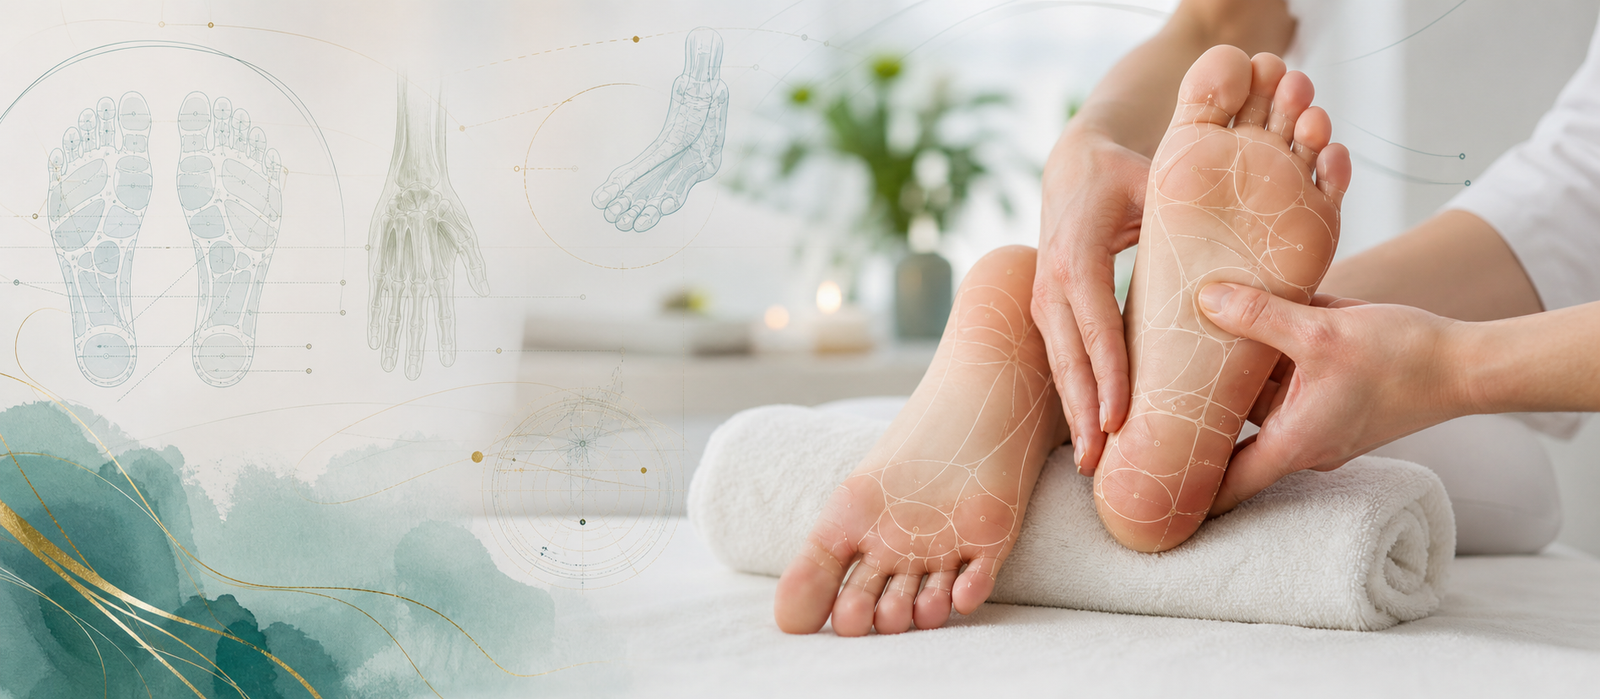
Eye strain is one of the most common modern discomfort patterns: tired eyes after screen work, pressure around the brow, mild headache, dryness, burning, blurry focus that improves with rest, or neck tension after hours of close visual work. The beginner-friendly WikiHow article on relieving eye strain with reflexology introduces a simple idea: gentle pressure points around the eyes, head, hands, and feet may help tired eyes feel calmer. This Wiki Reflexology guide keeps that accessible topic, but rebuilds it into a more professional, more detailed, and more safety-led resource.
The first rule is simple: do not press on the eyeball, do not force a painful point, and do not use reflexology to avoid eye care when symptoms are unusual. Eye strain is often temporary and related to prolonged screen use, glare, poor lighting, reduced blinking, uncorrected vision needs, dry air, or long periods of near-focus work. But eye pain, sudden vision change, double vision, flashes, floaters, severe redness, light sensitivity, injury, infection signs, or symptoms that do not improve with self-care need medical assessment.
Used responsibly, reflexology and acupressure-style massage can be a comfort routine. It may help the reader pause, breathe, soften facial and neck tension, blink more often, and create a short break from screens. It should not be described as a cure for dry eye disease, glaucoma, migraine, neurological symptoms, eye infection, refractive error, or any condition that needs diagnosis.
Editorial note: the public WikiHow article was used as a topic reference only. This article is original, substantially expanded, and rebuilt with new educational diagrams, stronger eye-safety language, foot and hand reflexology maps, screen-hygiene guidance, red flags, and medical source references.
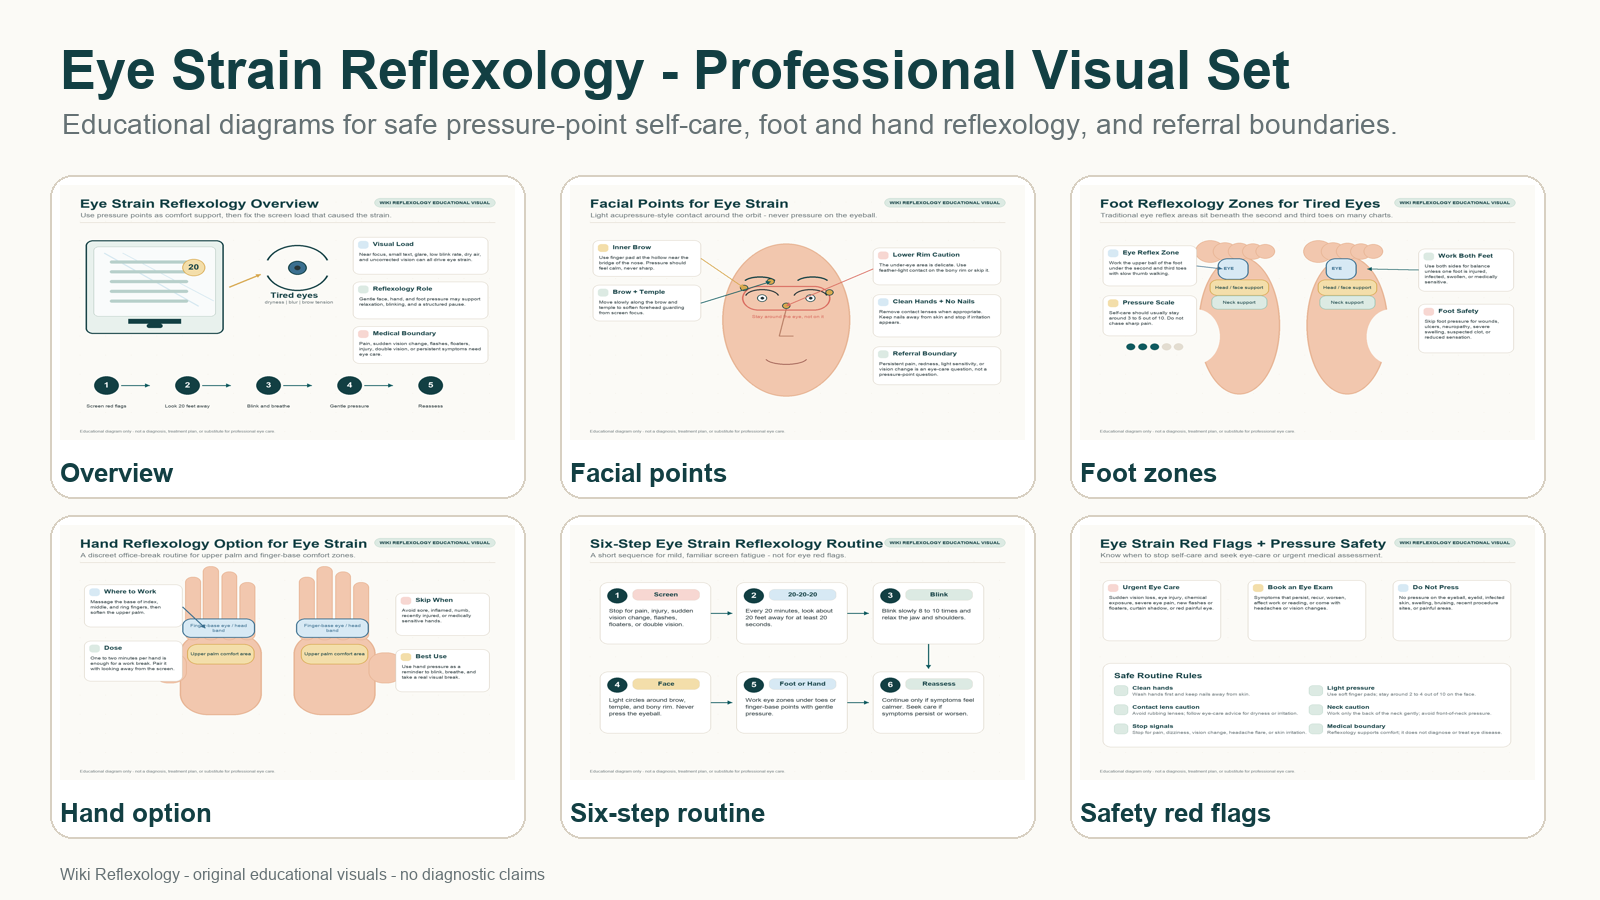
Professional Visual Set
These diagrams are made for education, not diagnosis. They show safe eye-strain pressure zones, traditional foot and hand reflexology areas, screen-break logic, and warning signs that should come before any self-care routine.
What Eye Strain Usually Means
Eye strain, often called digital eye strain or computer vision syndrome when screens are involved, is a group of symptoms rather than one single disease. A person may feel tired, dry, burning, itchy, watery, heavy, or sore eyes. They may also notice blurred vision, difficulty refocusing, frontal headache, temple tightness, neck stiffness, shoulder tension, or reduced concentration after close work.
Screen use is a major trigger because it asks the visual system to maintain near focus for long periods. People also tend to blink less while looking at digital devices, which can make the tear film less stable and leave the eyes feeling dry or gritty. Bright overhead light, window glare, small text, poor contrast, air-conditioning, fan airflow, awkward monitor height, and uncorrected vision problems can all add to the load.
The practical takeaway is important: reflexology should not be the only tool. The foundation of eye-strain relief is visual hygiene: take breaks, blink deliberately, manage glare, adjust monitor height and distance, enlarge text, correct prescription needs, and use appropriate eye drops when an eye-care professional recommends them. Reflexology can be placed beside those habits as a short relaxation layer.
What Reflexology Can and Cannot Do for Eye Strain
Reflexology is traditionally based on the idea that mapped zones on the feet, hands, ears, or face correspond to body regions. For eye strain, public tutorials often combine several traditions: facial acupressure points around the orbit, neck and skull-base pressure points, hand points, and foot reflex areas under the second and third toes. This combination can be useful as a routine, but the language needs to stay precise.
Reflexology may help a person relax, interrupt screen overuse, release facial guarding, reduce perceived tension, and become more aware of breathing and posture. Gentle massage around the brow, temples, skull base, hands, and feet can feel soothing. A structured routine can also remind the reader to stop staring at the screen and look into the distance.
Reflexology cannot correct myopia, astigmatism, presbyopia, glaucoma, cataracts, retinal problems, eye infection, neurological vision changes, or dry eye disease caused by a medical condition. It also cannot prove that a tender foot point means the eye is damaged. A reflexology map is a therapeutic map, not an eye exam.
The safest editorial position is therefore balanced: use pressure points for comfort, relaxation, and routine structure; use eye-care professionals for diagnosis, persistent symptoms, worsening symptoms, or vision changes.
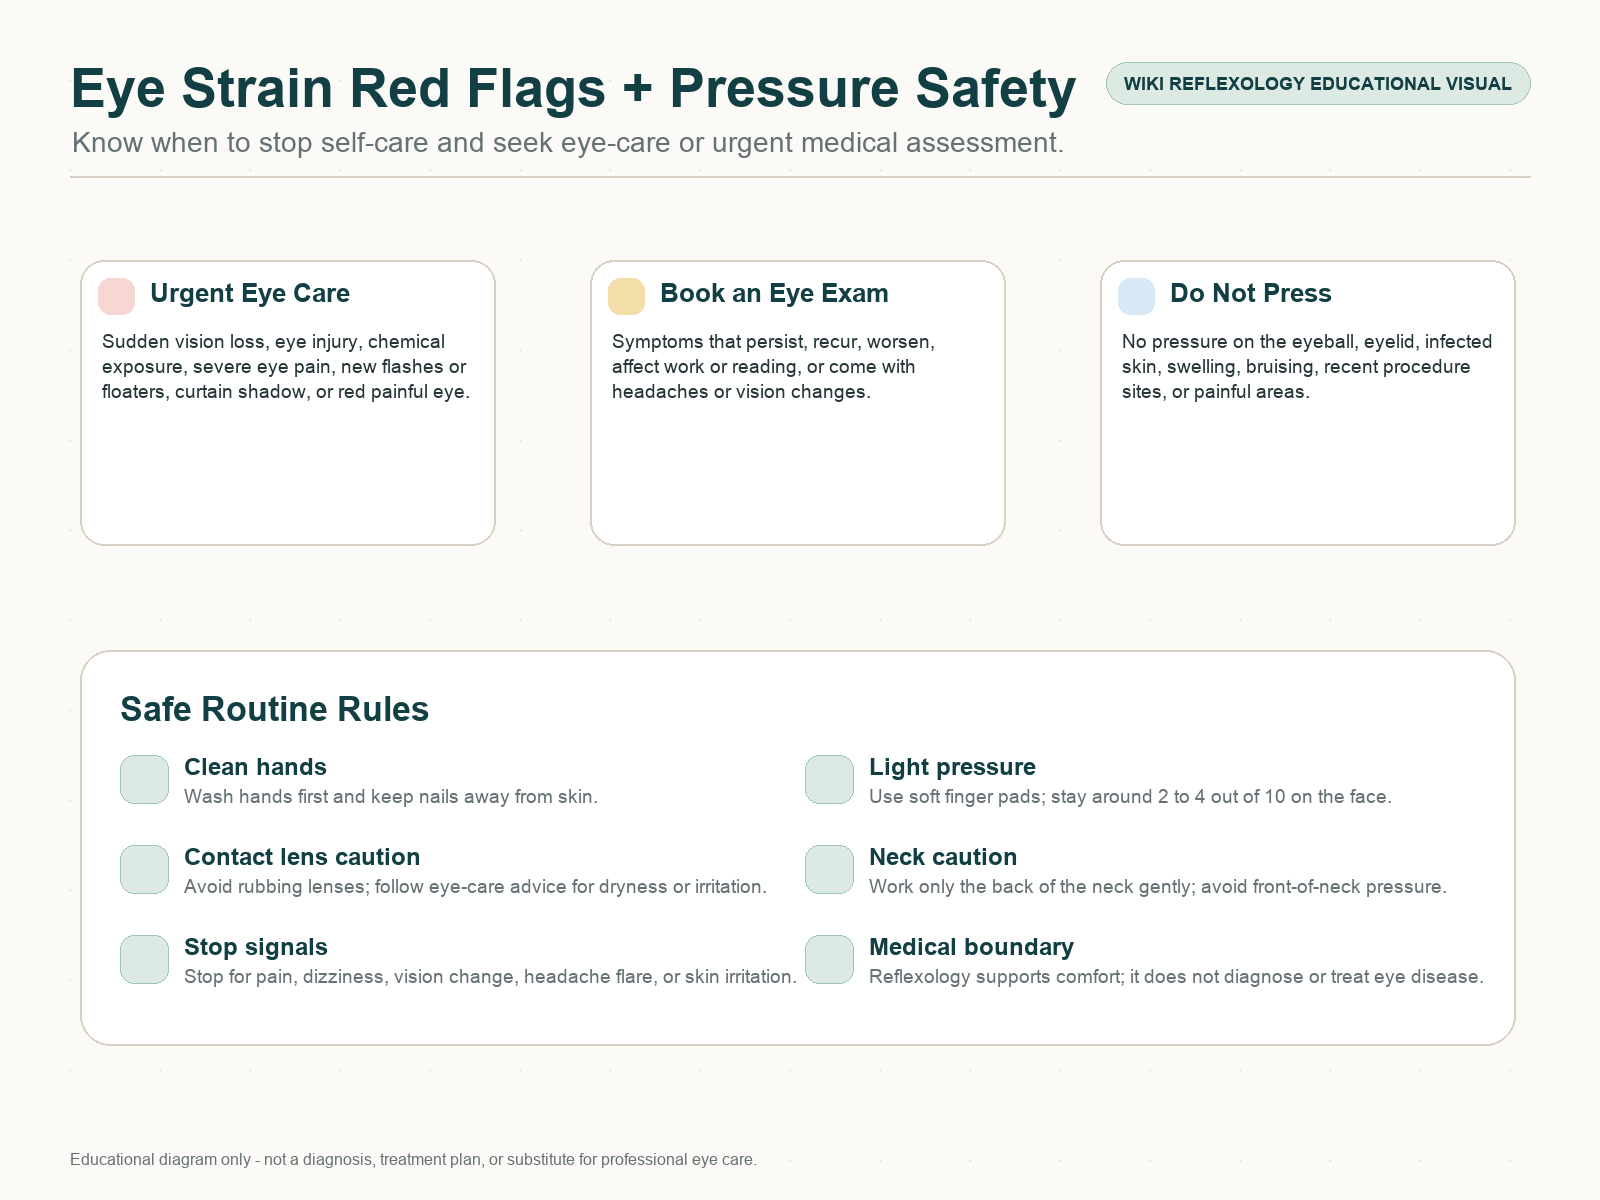
Check Eye Red Flags Before Any Routine
Before touching the face, feet, hands, neck, or skull base, ask whether this feels like ordinary tiredness or something that needs care first. Mild tired eyes after a long day at the computer are very different from sudden vision loss, eye injury, severe pain, or a red painful eye.
Seek urgent care for sudden vision loss, new double vision, severe eye pain, chemical exposure, eye trauma, new flashes or floaters, a curtain-like shadow, a red eye with significant pain, severe light sensitivity, or neurological symptoms such as facial weakness, confusion, severe dizziness, or trouble speaking. Make an appointment with an eye-care professional if eye discomfort, headache, or vision changes do not improve with self-care, or if symptoms are recurring and affecting work, reading, driving, study, or sleep.
There are also pressure-specific safety rules. Do not press directly on the eyeball. Avoid massage over infected skin, swelling, recent facial procedure sites, wounds, bruising, or painful sinus infection. Remove contact lenses before rubbing around the eyes. Keep nails away from the skin. Use clean hands. Around the neck, avoid the front of the throat and carotid pulse area; work only with gentle pressure at the back of the neck and skull base.
Facial Pressure Points Around the Eye
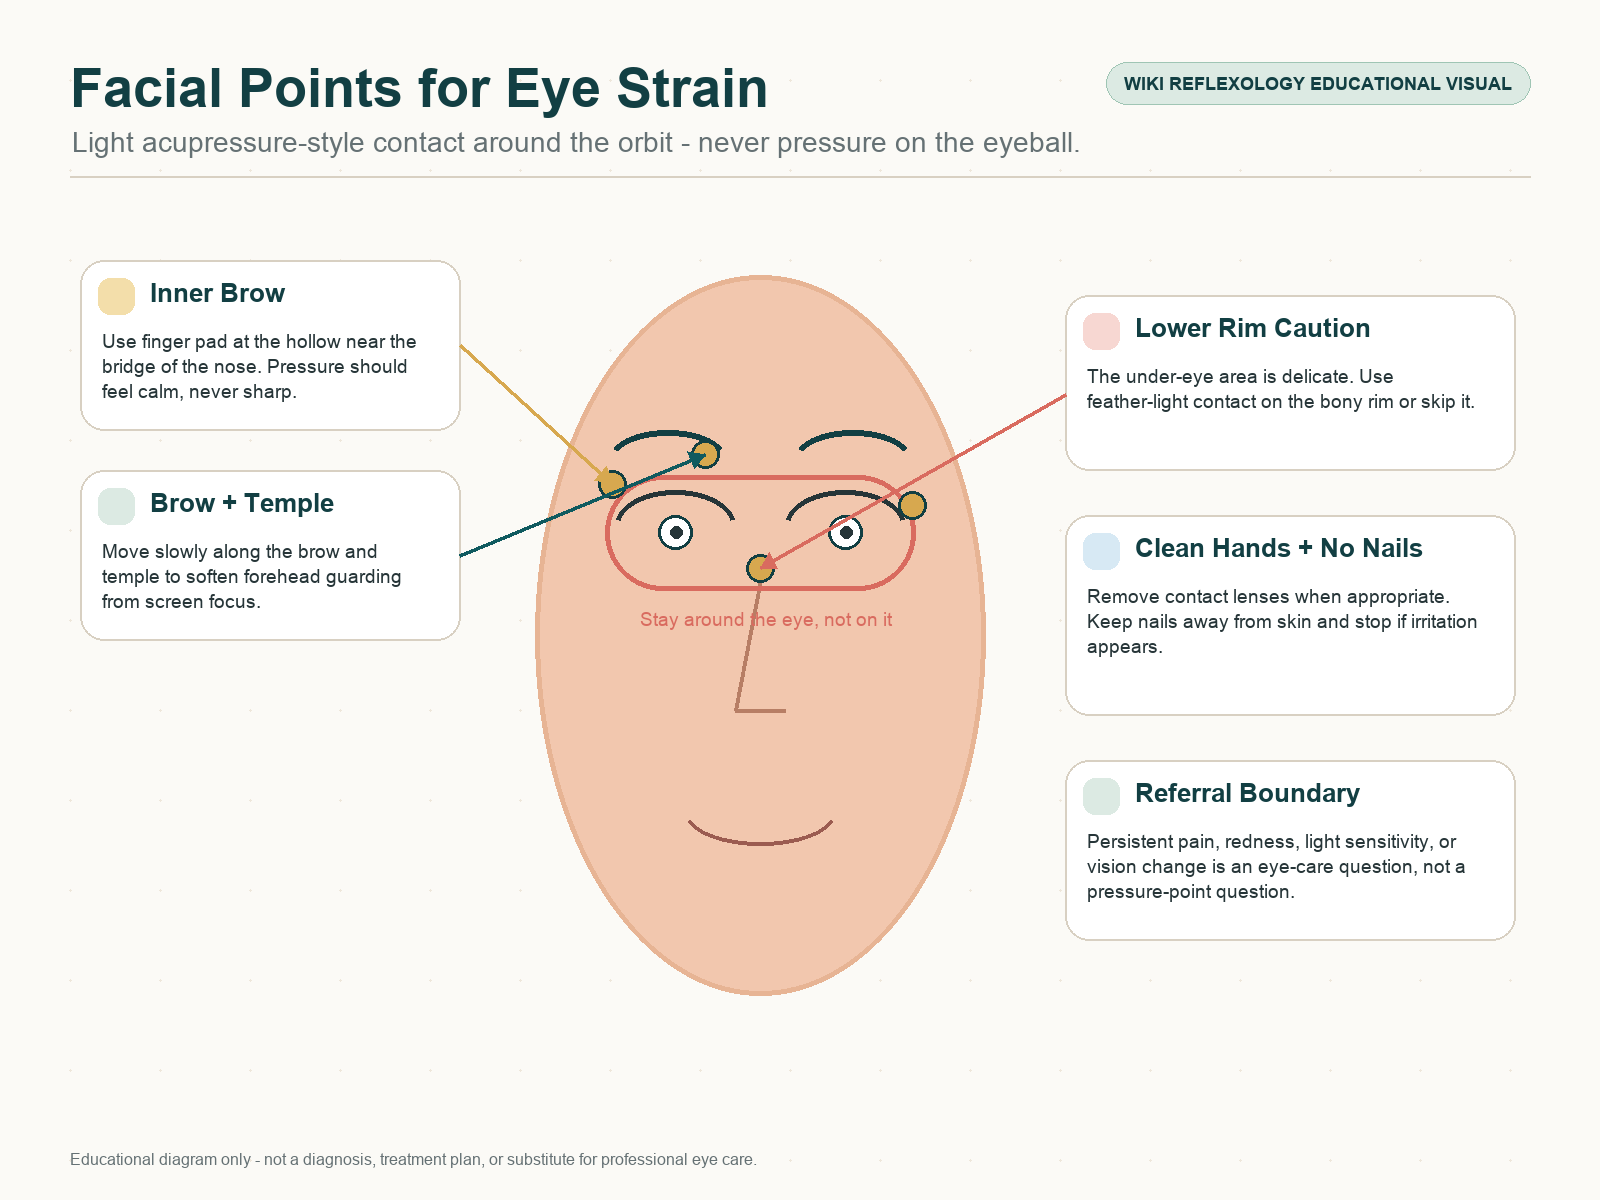
The WikiHow reference article focuses strongly on points near the eye: the hollow at the inner brow where the nose bridge meets the forehead, the area below the eye, the outer corner of the eye, and the middle of the eyebrow. In a professional guide, these should be described as acupressure-style comfort points, not as points that medically treat the eye.
Use the pads of the fingers, not fingernails. Work around the bony rim of the orbit, not on the eyeball or eyelid. A good pressure level is light to moderate: enough to feel contact, not enough to create pain. Spend about 5 to 10 seconds at each point, then release. Use tiny circles or still pressure. Keep the jaw relaxed and breathe slowly.
A safe sequence is: inner brow near the bridge of the nose, center of the brow above the pupil line, outer brow and temple, the bony area below the eye, then a broad finishing stroke across the forehead. The under-eye area is delicate; use very light pressure there, and skip it if the skin is irritated, recently treated, swollen, or sensitive.
For readers with migraines, sinus disease, eye disease, recent eye surgery, facial nerve symptoms, or unusual headache patterns, do not self-diagnose. Gentle contact may feel good, but persistent or atypical symptoms deserve professional evaluation.
Foot Reflexology Zones for Tired Eyes
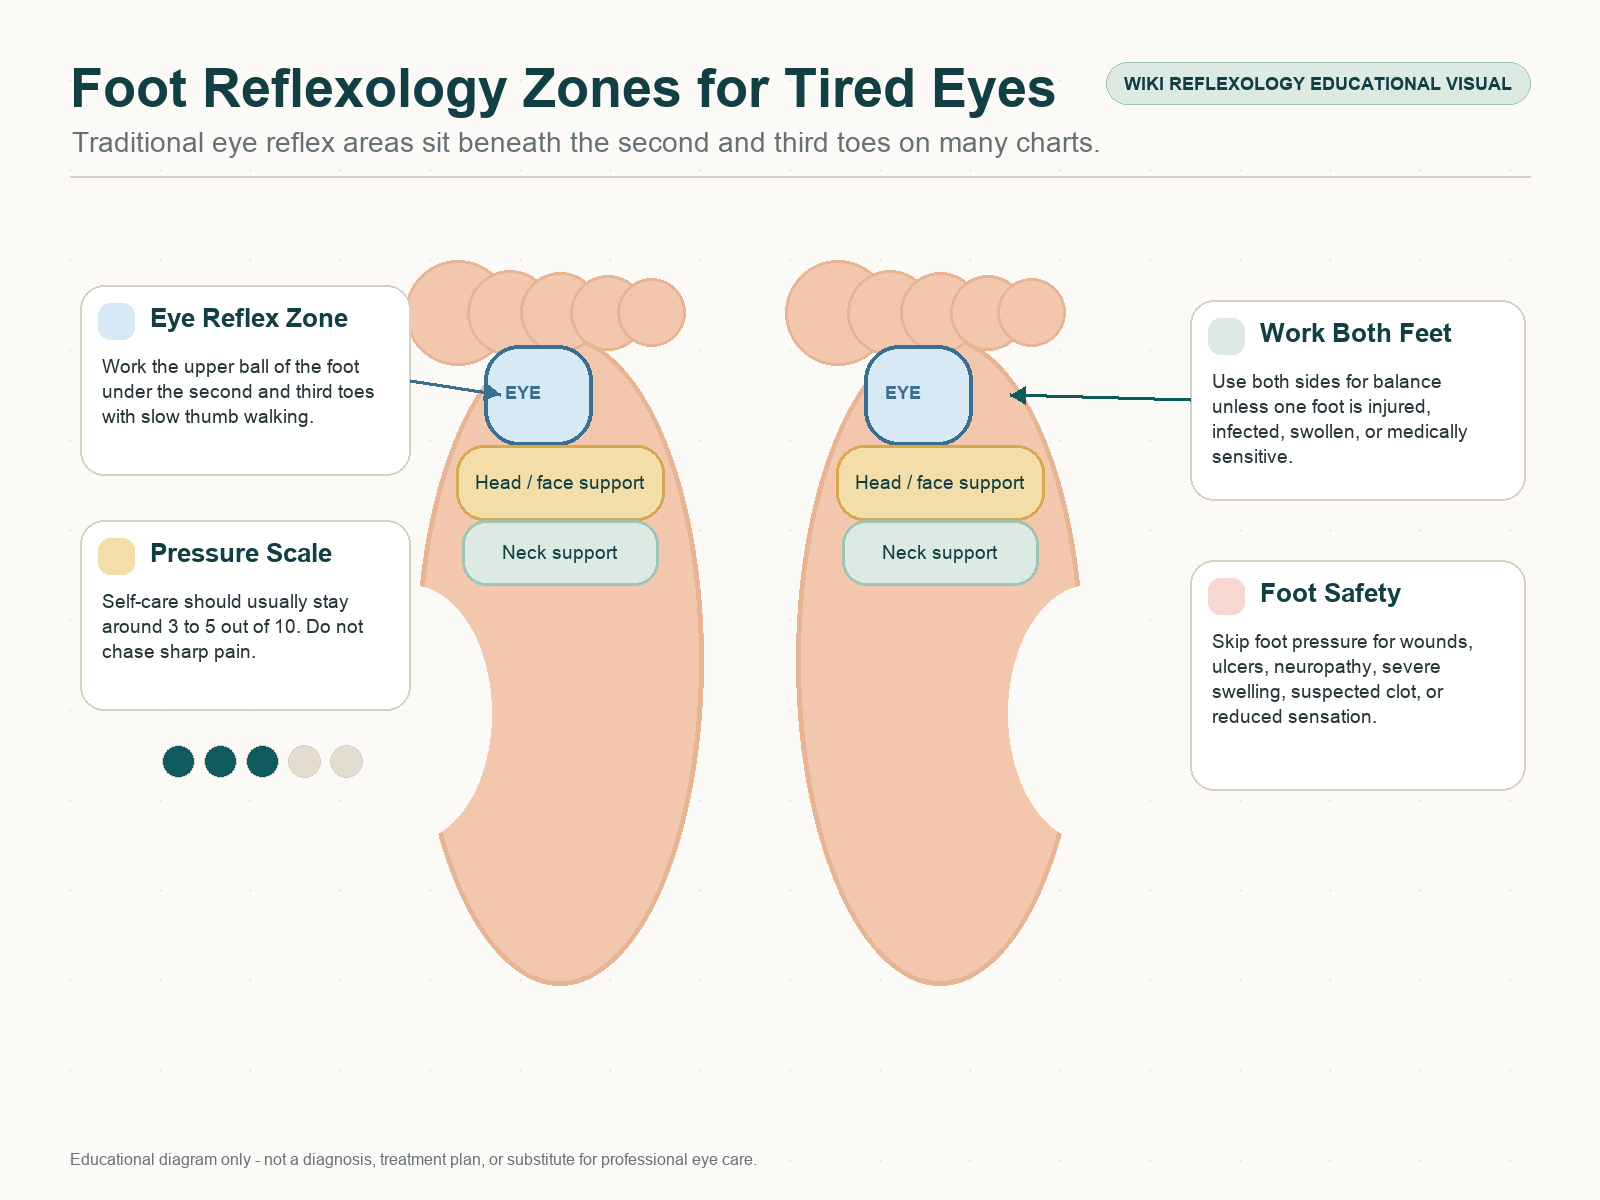
Traditional foot reflexology charts usually place the eye reflex zones near the ball of the foot, often under the second and third toes. The toes themselves are commonly mapped to the head, face, and sensory organs. Because eye strain is often linked with head, brow, neck, and screen fatigue, many reflexology routines include the toe bases, the upper ball of the foot, the big toe, and sometimes the neck reflex area at the base of the big toe.
To work these areas safely, sit comfortably and support one foot. Warm the whole foot first with broad contact. Then use slow thumb walking across the ball of the foot beneath the second and third toes. Continue across the base of the toes with light, even pressure. Spend a little extra time where the tissue feels pleasantly tender, but do not dig into sharp pain. Work both feet for balance unless one foot is injured or medically unsuitable.
Foot reflexology is especially useful when facial touch is not preferred. Some readers dislike pressure near the eyes, wear makeup, use contact lenses, or have sensitive skin. Working the feet can provide a calmer, less delicate option while still giving the nervous system a break from screens.
Use caution with diabetes, neuropathy, reduced sensation, foot ulcers, active skin infection, severe swelling, blood-clot concern, recent foot injury, or fragile skin. When foot safety is uncertain, choose a hand routine or skip pressure work until appropriate care is available.
Hand Reflexology Option for Eye Strain
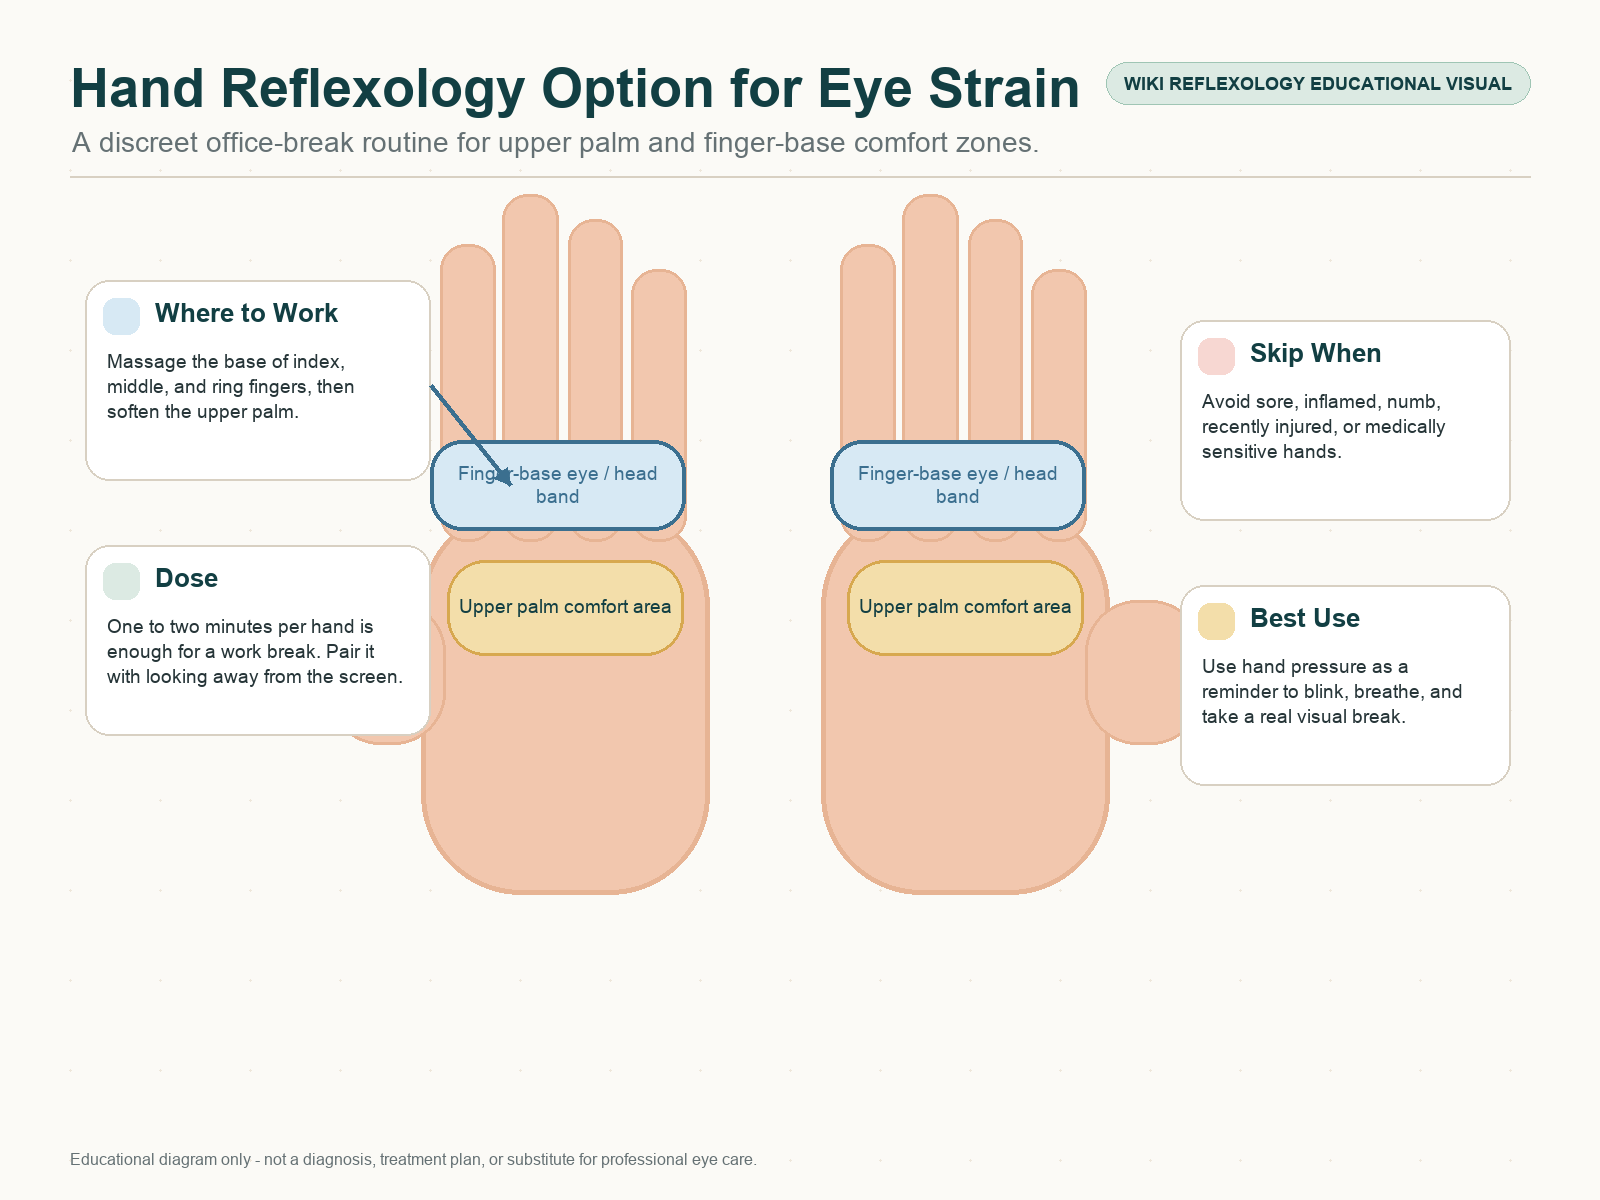
A hand routine is practical at work, on a plane, before sleep, or whenever the feet are not available. Traditional hand reflexology maps often place head and eye references around the fingers and the upper palm. Public pressure-point routines also use the base of the index, middle, and ring fingers, plus gentle thumb pressure across the web and upper palm, to help people pause and reduce tension.
Start by rubbing the palms together for warmth. Then use the opposite thumb to massage the base of the index finger, middle finger, and ring finger. Work slowly across the knuckle line and upper palm. Keep the wrist relaxed. If the hand is sore, inflamed, numb, arthritic, or recently injured, reduce pressure or skip the routine.
The hand option should feel simple and discreet. Spend one to two minutes per hand, then look away from the screen and blink slowly. This combination matters: the hand point is not a substitute for the visual break. It is the anchor that helps the reader actually take the break.
Neck and Skull-Base Points for Screen Fatigue
Eye strain rarely lives only in the eyes. Long screen sessions often involve forward head posture, raised shoulders, jaw tension, and tightness where the skull meets the neck. That is why many traditional pressure-point routines include the back of the head and upper neck. The WikiHow reference mentions points commonly known as the wind mansion and heavenly pillar areas. In plain language, these are the midline skull-base hollow and the paired muscles just below and slightly outward from the skull base.
Use these areas gently. Place the fingertips at the back of the head, not the front of the throat. Apply light pressure upward into the skull-base muscles for a few seconds, then release. Do not press hard, hold the breath, compress the front of the neck, or force the head backward. People with neck injury, dizziness, vascular disease, neurological symptoms, severe headache, or recent trauma should skip this section and seek appropriate care.
For ordinary screen fatigue, the safest version is not deep pressure. It is a posture reset: lower the shoulders, lengthen the back of the neck, soften the jaw, look into the distance, and breathe. Reflexology and pressure points are most helpful when they support better behavior, not when they become another form of strain.
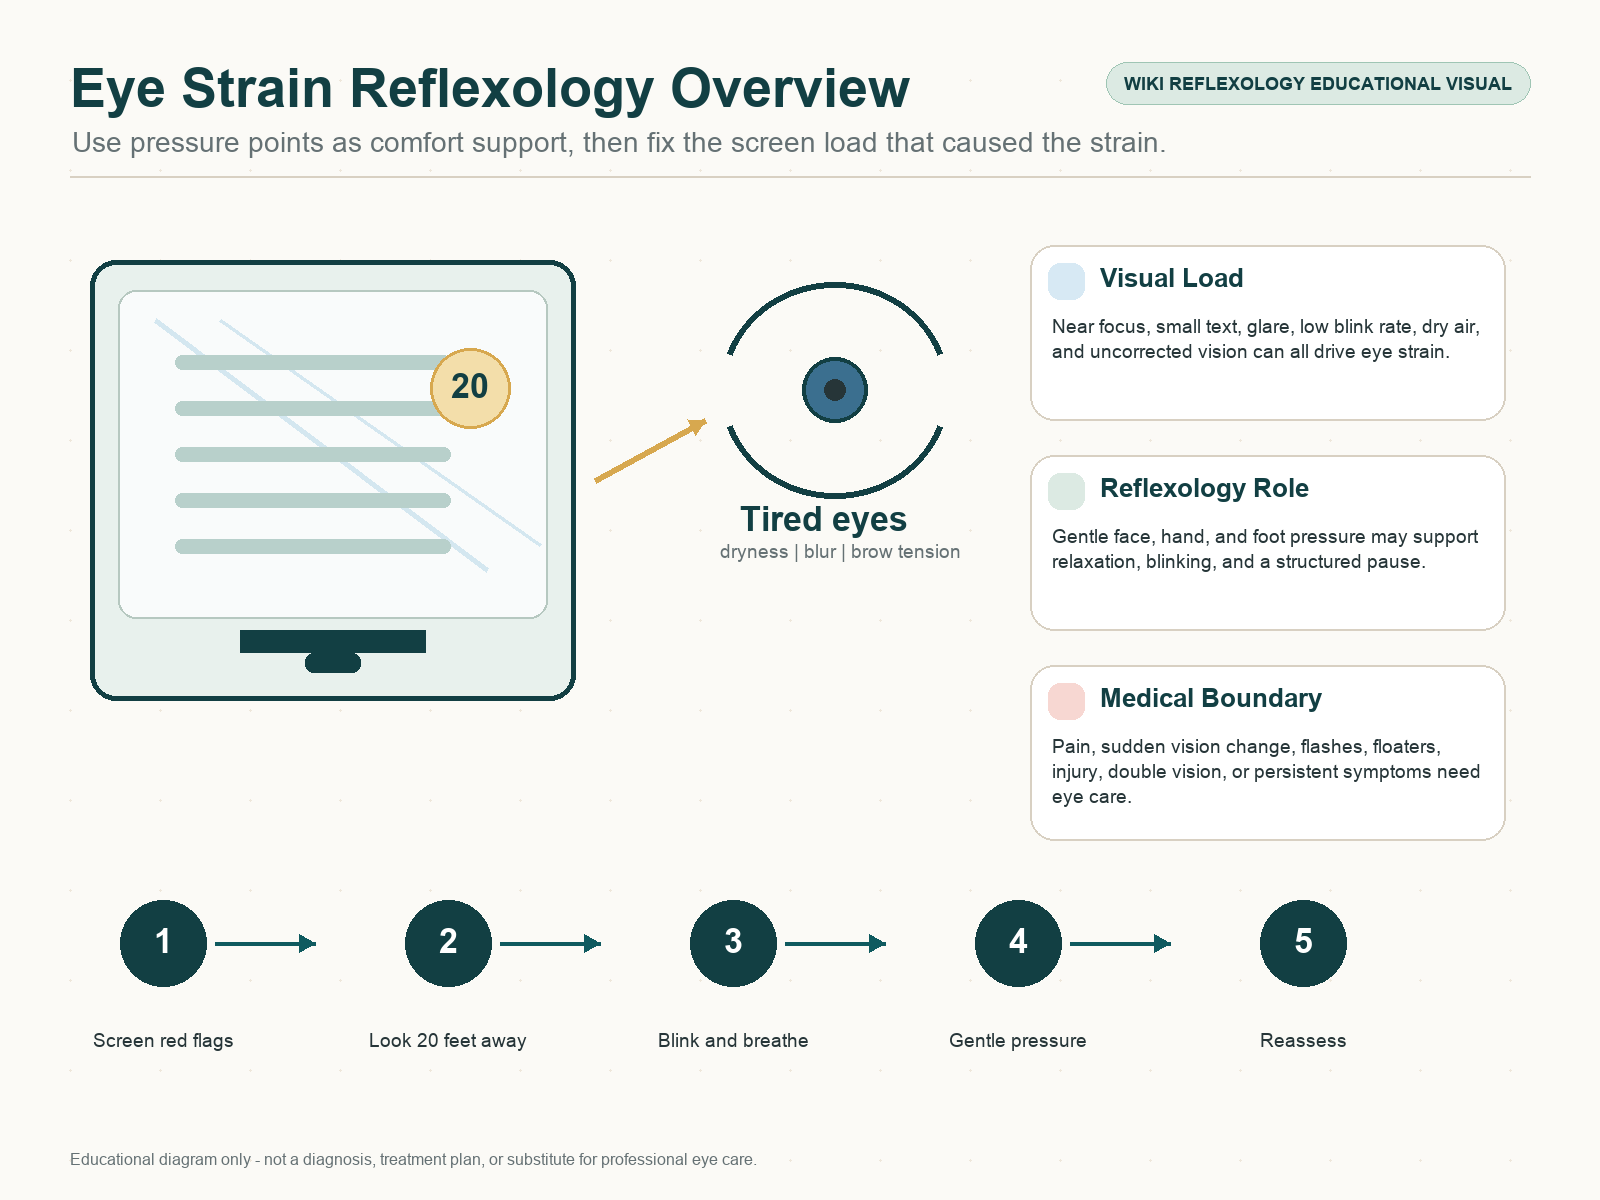
A Six-Step Eye Strain Reflexology Routine
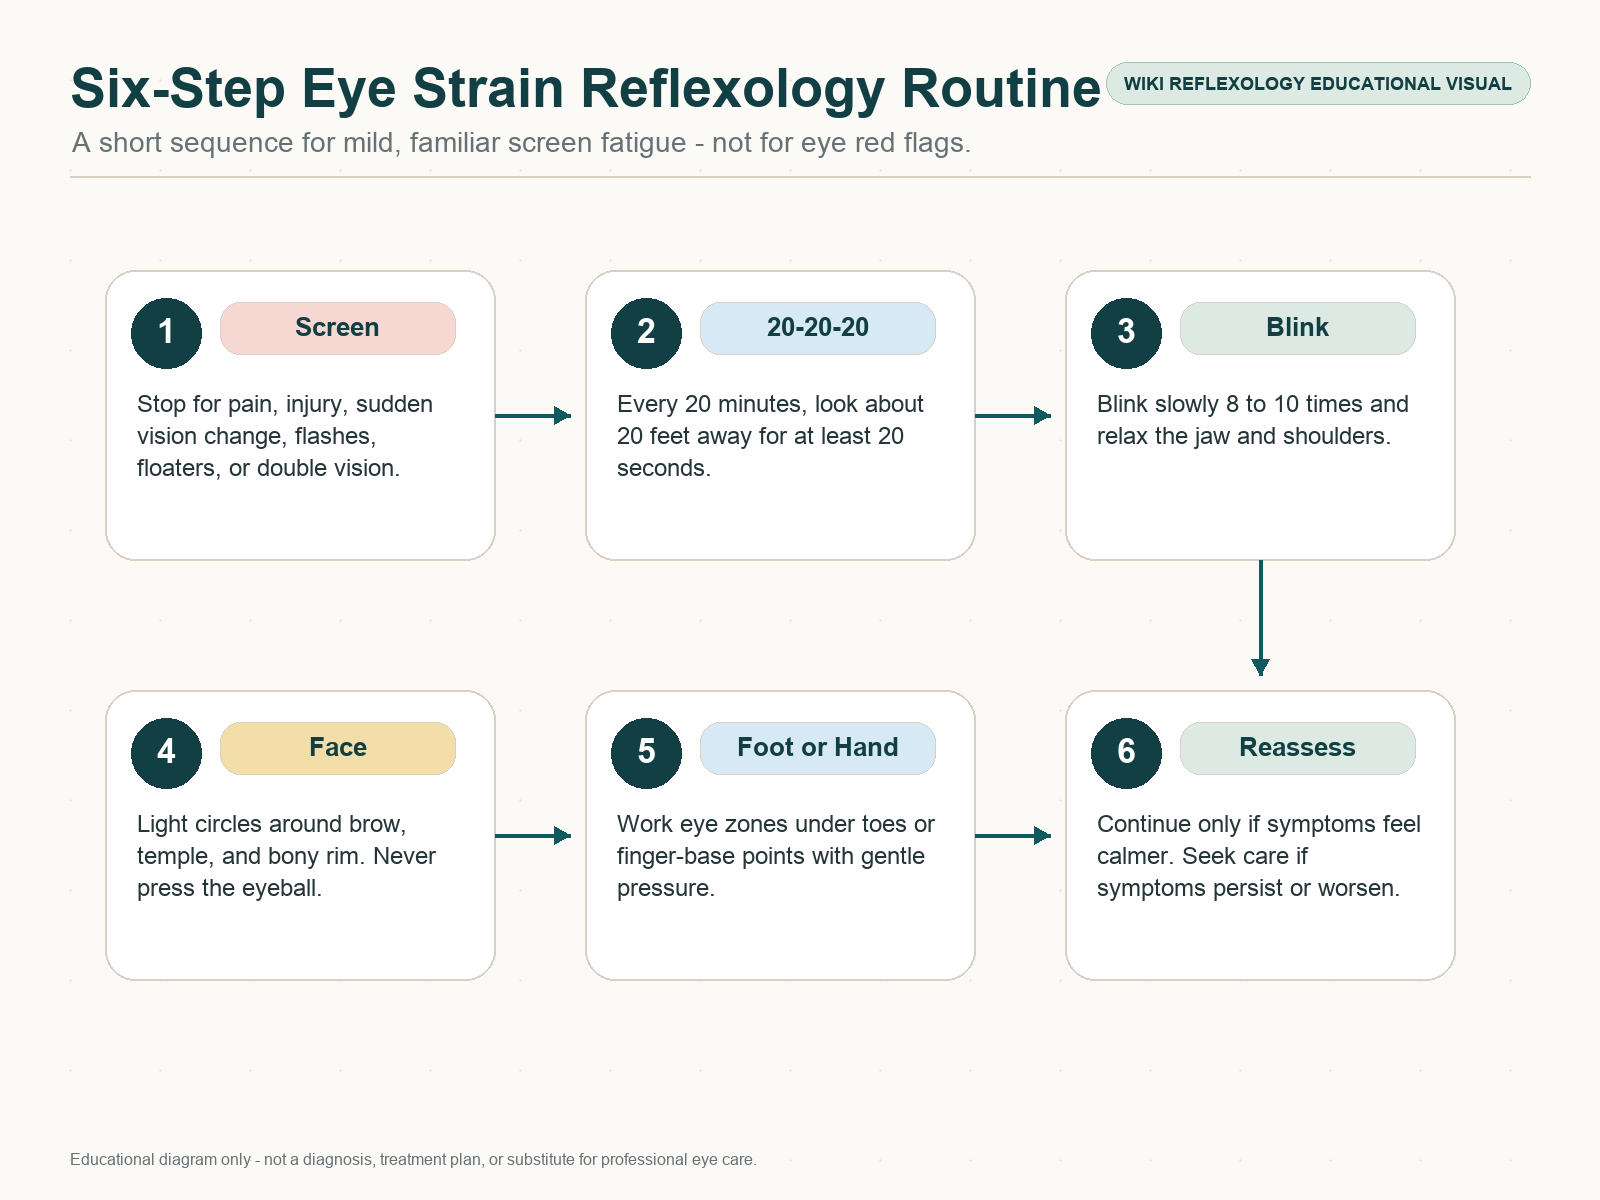
This routine is for mild, familiar eye tiredness without red flags. It is not for sudden vision changes, eye injury, infection signs, severe headache, neurological symptoms, or pain that feels unusual.
- Screen: stop first for sudden vision loss, double vision, severe eye pain, red painful eye, flashes, floaters, trauma, chemical exposure, or neurological symptoms.
- Reset the eyes: use the 20-20-20 rule: every 20 minutes, look at something about 20 feet away for at least 20 seconds.
- Blink and breathe: blink slowly 8 to 10 times, relax the jaw, and let the shoulders drop.
- Face: use light circles around the brow, temple, and bony orbital rim. Stay around the eye, never on the eyeball.
- Foot or hand: work the upper ball of the foot under the second and third toes, or massage the base of the index, middle, and ring fingers.
- Reassess: notice whether the eyes feel calmer, unchanged, or worse. Stop and seek care if symptoms persist, worsen, or feel unusual.
A reasonable self-care dose is 5 to 12 minutes total. More is not automatically better. If pressure creates soreness, dizziness, headache flare, skin irritation, eye pain, or vision change, stop. The goal is to reduce load, not to add stimulation.
5, 10, and 15 Minute Session Designs
A five-minute version is best for a work break. Look away from the screen for 20 seconds, blink slowly, massage the brow and temples for one minute, work one hand for one minute, work the other hand for one minute, then finish with a skull-base posture reset. This is not a complete therapeutic session; it is a micro-break with structure.
A ten-minute version works well at home. Begin with two minutes of screen and lighting adjustment: dim glare, enlarge text, lower shoulders, and check monitor distance. Spend three minutes on facial points, three minutes on foot reflex zones, and two minutes resting with eyes closed or looking into the distance. If contact lenses make the eyes dry, follow the plan given by your eye-care professional rather than rubbing the eyes.
A fifteen-minute version is the upper limit for most self-care readers. Use three minutes for visual reset and breathing, four minutes for facial and temple work, four minutes for both feet, two minutes for both hands, and two minutes for stillness. If symptoms require long daily routines to remain tolerable, that is a sign to review the screen setup and consider professional eye care.
Choose Facial Points When
The eyes feel tired but there is no pain, redness, infection sign, recent procedure, or skin irritation, and the reader can keep pressure light.
Choose Feet or Hands When
Facial touch is not preferred, makeup or contact lenses are involved, the skin is sensitive, or the reader wants a discreet routine away from the eyes.
How to Combine Reflexology with Evidence-Based Eye Strain Care
The strongest eye-strain plan is boring in the best possible way. Take regular breaks. Blink often. Reduce glare. Keep the screen about an arm's length away. Position the screen slightly below eye level. Use larger text and comfortable contrast. Avoid dry air blowing directly toward the face. Ask an eye-care professional about artificial tears, computer glasses, contact lens dryness, or prescription updates when needed.
Reflexology fits into that plan as a behavior anchor. If the reader uses a hand pressure point every time a timer rings, they are more likely to look away from the screen. If they massage the brow lightly after closing the laptop, they may stop carrying the workday in the forehead and jaw. If they spend a few minutes on foot reflex zones before bed, the benefit may come from relaxation as much as from the traditional map.
This is not a weakness of the practice. It is the responsible way to use it. Reflexology is strongest when it supports rest, body awareness, and comfort. It is weakest when it is forced to make medical claims it cannot support.
Common Mistakes to Avoid
- Pressing on the eyeball: all facial work should stay around the bony rim and surrounding tissue, never on the eye itself.
- Ignoring vision changes: sudden blurry vision, double vision, flashes, floaters, severe redness, or eye pain are not routine eye strain.
- Using pressure as a substitute for breaks: the 20-20-20 rule, blinking, glare control, and screen setup remain the foundation.
- Rubbing with contact lenses in: remove lenses when appropriate and follow eye-care advice for dryness or irritation.
- Working too hard around the neck: avoid front-of-neck pressure and skip neck work for dizziness, trauma, neurological symptoms, or severe headache.
- Claiming to improve eyesight: comfort work should not be marketed as a cure for refractive error, glaucoma, cataracts, retinal disease, or dry eye disease.
Aftercare and Progress Tracking
After a routine, rate three things: eye comfort, visual clarity, and screen tolerance. If the eyes feel calmer and focusing is easier after a break, that suggests the routine may be useful as part of a larger habit plan. If symptoms return immediately whenever screen work resumes, the workspace, prescription, tear film, or screen schedule may need attention.
Keep a simple log for one week: screen hours, symptoms, break frequency, sleep, contact lens use, room airflow, lighting, and whether self-care helped. This is more useful than trying to identify one perfect pressure point. Eye strain is often a load-management problem, and the log shows which parts of the load are easiest to change.
For practitioners, documentation should include the client goal, eye-strain history, red flags screened, pressure areas used, pressure level, client response, and any referral advice. Do not record a foot reflex as proof of an eye diagnosis. Record it as a therapeutic area worked and the client's subjective response.
Our Recommendation as a Reflexology Education Site
Our recommendation is to use eye strain reflexology as a gentle comfort routine, not a vision-treatment protocol. The best version is short, clean, light, and paired with real eye-strain prevention. It begins with red flags, uses face, hand, and foot points with conservative pressure, and ends with a screen reset.
For students, the priority is scope of practice. Learn the traditional eye reflex zones, but also learn what eye symptoms are outside reflexology. A student who can say "this needs an eye-care professional" is more trustworthy than one who memorizes a dozen pressure points but ignores warning signs.
For readers at home, the best routine is repeatable and modest. Wash your hands, keep pressure light, take screen breaks, blink, reduce glare, and stop if symptoms feel unusual. If discomfort or vision changes do not improve with self-care, book an eye-care appointment. Reflexology belongs beside sensible care, not in front of it.
FAQ: Eye Strain and Reflexology
Can reflexology really relieve eye strain?
Reflexology and acupressure-style massage may help some people feel more relaxed and comfortable, especially when eye strain is linked with screen overuse, facial tension, or stress. It should not be presented as a proven cure for eye conditions.
Which foot reflexology point is used for eyes?
Many traditional charts place eye reflex zones on the ball of the foot beneath the second and third toes. Work gently across both feet after warming the whole foot, and avoid pressure on unsafe or medically sensitive feet.
Is it safe to massage around my eyes?
Use only light pressure around the bony rim, brow, and temples. Do not press on the eyeball, eyelid, infected skin, swollen areas, recent procedure sites, or painful regions. Stop if symptoms worsen.
Does the 20-20-20 rule matter if I am using reflexology?
Yes. The 20-20-20 rule is part of the foundation: every 20 minutes, look about 20 feet away for at least 20 seconds. Reflexology should support that break, not replace it.
When should I see an eye-care professional?
Seek care for persistent eye discomfort, recurring headaches, vision changes, severe redness, eye pain, flashes, floaters, injury, double vision, or symptoms that do not improve with sensible self-care.
Scientific, Medical, Therapeutic, and Book References
Online references
- WikiHow: How to Relieve Eye Strain with Reflexology. Topic reference for the beginner question; not copied.
- Mayo Clinic: Eyestrain Diagnosis and Treatment. Medical guidance on eye breaks, blinking, glare, artificial tears, screen setup, and care timing.
- Cleveland Clinic: Computer Vision Syndrome. Digital eye strain overview, 20-20-20 breaks, ergonomic adjustments, and referral guidance.
- NCCIH: Reflexology. Evidence and safety overview for reflexology as a complementary practice.
- Digital Eye Strain: A Comprehensive Review. Review of symptoms, risk factors, and management considerations.
- The Relationship Between Dry Eye Disease and Digital Screen Use. Review of screen use, blink dynamics, and dry eye symptoms.
Book references
- Ingham, E. Stories the Feet Can Tell Thru Reflexology. Historical reflexology reference.
- Byers, D. Better Health with Foot Reflexology. International Institute of Reflexology.
- Dougans, I. The Complete Illustrated Guide to Reflexology. Reflexology chart and practice reference.
- Marquardt, H. Reflexotherapy of the Feet. Professional reflex-zone therapy reference.